

ARDUINO
IDE simple introduction
Arduino IDE 是基于 Arduino 硬件产品的软件编辑环境。作为 Arduino 的专业开发工具,IDE主要用于 Arduino 程序代码编写和开发,并将程序内容上传至 Arduino 板,实现代码运行。
Arduino IDE is a software editing environment based on Arduino hardware products. As a professional development tool of Arduino, IDE is mainly used for Arduino program code writing and development, and uploads the program content to Arduino board to realize code operation.
IDE是开源的设计工具,可以用于任何种类的 Arduino 板,且支持多种程序互动,如:Flash、Max/Msp、VVVV、PD、C、Processing等。
IDE is an open source design tool, which can be used for any kind of Arduino board, and supports a variety of program interaction, such as flash, Max / MSP, VV, PD, C, processing, etc.
打开 Arduino IDE 软件,并将 Arduino 板接入端口进行连接。程序编写完成后,可通过IDE对程序进行编译,并检查代码是否正确,编译完成后可上传至 Arduino 板,构建相应的硬件模组,即可实现 Arduino 工具的控制和使用。
Open the Arduino ide software and connect the Arduino board to the port. After the program is written, you can compile the program through the IDE and check whether the code is correct. After the compilation, you can upload it to the Arduino board and build the corresponding hardware module to realize the control and use of Arduino tools.
Case One 开关+LED
我们在课堂上尝试了这个案例,学习了 Arduino 中的基本数字I/O。在这种情况下,我们可以用一个按钮来控制 LED 灯。整个 demo 的逻辑是:LED 的亮灭由开关控制。开关按下,小灯亮;开关松开,小灯灭。如下是本案例的模拟电路图:
We tried this case in class to learn the basic digital I/O in Arduino. in this case we can use a button to control the LED light. The logic of the whole demo is: the LED is controlled by a switch to light up or down. When the switch is pressed, the small light is on; when the switch is released, the small light is off.The following is the analog circuit diagram for this case.


使用 Tinkercad 网站及 Fritzing 对课程案例电路进行模拟,并制作展示图和动态图。如下是本案例的代码:
Use the Tinkercad website and Fritzing to simulate the course case circuits and create display and dynamic diagrams.The following is the code of this case:
实际组装中,我们进行了两轮的迭代:
For the actual assembly, two iterations were performed.

BEFORE
我们按照功能要求组装电路,并进行测试
The WooHoo group is a small industrial design team with a not too long history and an out

NOW
我们根据老师的意见,规范了杜邦线的使用,依照规范调整杜邦线接线顺序,将红色接 5V,黑色接 GND,彩色线接信号接口,同时统一了线条长度,使视觉效果更规整和统一。
We standardized the use of Dupont wire according to the teacher's comments, and adjusted the order of Dupont wire wiring according to the specification, connecting red to 5V, black to GND, and colored wire to the signal interface, while unifying the line length to make the visual effect more neat and uniform.
Case two 色彩可自定义的彩色RGB控制灯
这是一个可以使用三个滑动开关控制灯光颜色的小装置。RGB 灯作为系统的输出,三个滑动变阻器作为输入,分别控制红色、绿色和蓝色部分的亮度。我们参考和优化现有代码,将每个颜色的引脚与一个开关连接,以独立控制灯光的 RGB 通道。程序中调用了 map 函数,将滑动变阻器的值调节成 0-255。
This is a small device that can control the color of the lights using three slide switches. RGB lights are used as the output of the system and three slide resistors are used as the input to control the brightness of the red, green and blue parts. We refer to and optimize the existing code by connecting each color pin to a switch to control the RGB channel of the light independently. The program calls the map function to adjust the value of the sliding rheostat to 0-255.
我们用到了一个彩色 LED 灯和3个滑动变阻器。
We used a color LED lamp and three sliding rheostats..

彩色RGB
color LED lamp

滑动变阻器
sliding rheostat
按照功能组装电路,使用 Tinkercad 网站及 Fritzing 对课程案例电路进行模拟,并制作展示图和动态图。
Assemble the circuit according to the function, simulate the course case circuit using the Tinkercad website and Fritzing, and create display and dynamic diagrams.


演示搭建好的 Arduino 原型,并对 Arduino 原型的展示效果进行拍摄,并记录。
Assemble the circuit according to the function, simulate the course case circuit using the Tinkercad website and Fritzing, and create display and dynamic diagrams.


Arduino 代码如下:
The Arduino code is as follows
Case three 自平衡云台
准备知识
preparation
当你需要保持一个物品的平衡,或者需要得到物品倾斜的角度,下面内容即是实现这一功能。
When you need to maintain the balance of an item or get the tilt angle of the item, the following content is to realize this function.
功能:当你的立足的空间倾斜或者角度改变时,在自平衡稳定器将保持平衡或保持一定角度,防止倾斜导致不利的结果。稍微修改也可以用于输出空间俯仰、滚转、偏航三个方向的倾斜角度。
Function: when your foothold space tilts or the angle changes, the self balancing stabilizer will maintain balance or maintain a certain angle to prevent adverse results caused by tilting. Slight modification can also be used to output the tilt angle in three directions: pitch, roll and yaw.
实现思路:通过处理 arduino 使用六轴姿态传感器得到的原始数据,得到空间俯仰、滚转、偏航三个方向的倾斜角度,进而 arduino 控制舵机的角度,达到自我平衡的效果,当然这里也可以使用 LCD、OLED 等输出俯仰、滚转、偏航三个方向的倾斜角度。这里使用的舵机可能或出现抖动的情况,需要要求精度,可以使用伺服电机或其他设备。
Function: when your foothold space tilts or the angle changes, the self balancing stabilizer will maintain balance or maintain a certain angle to prevent adverse results caused by tilting. Slight modification can also be used to output the tilt angle in three directions: pitch, roll and yaw.The steering gear used here may vibrate or need precision. Servo motor or other equipment can be used.
Mpu6050 六轴姿态传感器介绍
Introduction of mpu6050 six axis attitude sensor
MPU-6000为全球首例整合性6轴运动处理组件,整合了3轴陀螺仪、3轴加速器,解决了组合陀螺仪与加速器时存在的一些问题,还包含了内建的温度感测器、DMP(Digital Motion Processor)。
Mpu-6000 is the first integrated 6-axis motion processing component in the world. It integrates 3-axis gyroscope and 3-axis accelerator, solves some problems existing in the combination of gyroscope and accelerator, and also includes built-in temperature sensor and DMP (digital motion processor)
DMP:可以直接输出四元数,减少复杂的融合演算数据、感测器同步化、姿势感应等的负荷。
DMP: it can directly output quaternions to reduce the load of complex fusion calculus data, sensor synchronization, pose sensing, etc

MPU-6000的角速度感测范围为±250、±500、±1000与±2000°/sec (dps),可以准确捕捉快速与慢速动作,用户可程式控制的加速器全格感测范围为±2g、±4g±8g与±16g。产品传输可透过最高至400kHz的I2C或最高达20MHz的SPI。
The angular velocity sensing range of mpu-6000 is ± 250, ± 500, ± 1000 and ± 2000 ° / sec (DPS), which can accurately capture fast and slow movements. The full grid sensing range of user programmable accelerator is ± 2G, ± 4G ± 8g and ± 16g. The product can be transmitted through I2C up to 400kHz or SPI up to 20MHz.
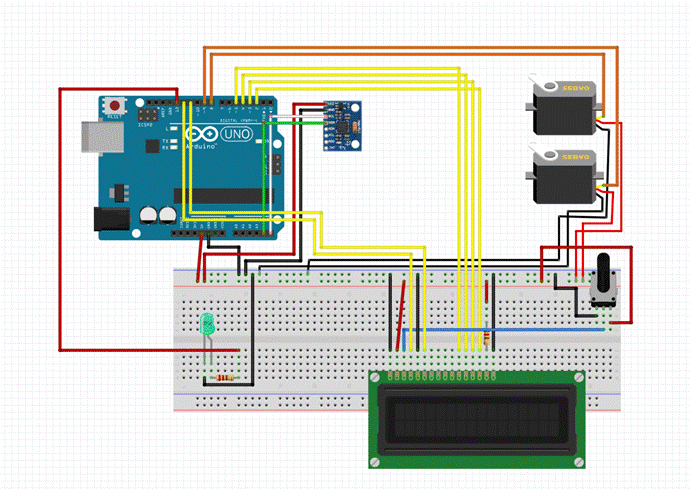
本文用到的元器件有:mpu6050,舵机X2,LCD屏幕,电阻X2,led灯,uno板,面包板。
我们用到mpu6050陀螺仪芯片来采集x轴和y轴的转动角度,以此来控制舵机的转动角度。在LCD显示屏上,我们显示了舵机目前转动的角度。如果整个设备正常工作,led灯则会亮起。
The components used in this paper are: mpu6050, Steering Gear X2, LCD screen, resistance X2, LED lamp, uno board and bread board.
We use mpu6050 gyroscope chip to collect the rotation angles of x-axis and y-axis, so as to control the rotation angle of steering gear. On the LCD screen, we show the current rotation angle of the steering gear. If the whole equipment works normally, the LED light will be on.

Mpu6050
Mpu6050

舵机
steering engine

LCD显示屏
LCD1602

LED 灯
LED lamp
按照功能组装电路,并进行演示
Assemble the circuit according to the function and demonstrate it


视频展示
The following is a video presentation.

使用 Tinkercad 网站及 Fritzing 对课程案例电路进行模拟,并制作展示图。
Simulate the course case circuit using the Tinkercad website and Fritzing and create display.
Case four iot
案例由 NodeMCU、LED、滑动变阻器等部件构成,使用 esp8266库 使 NodeMCU 连接Wi-Fi,使用阿里云平台实现了云端控制输入信号,在阿里云上设置主灯开关开启,绿灯就会亮起。在阿里云上设置主灯开关关闭,绿灯就会熄灭。滑动滑动变阻器,阿里云上电位器的信息就会发生改变,当电位器的数值超过500时,红灯就会亮起,反之熄灭。如下是本案例的模拟电路图和电路图:
The case is composed of NodeMCU, LED, sliding resistor and other components, using esp8266 library to make NodeMCU connect Wi-Fi, using Ali cloud platform to realize the cloud control input signal, set the main light switch on on Ali cloud, the green light will be on. Set the main light switch off on AliCloud, the green light will be off. Slide the sliding rheostat, the information of the potentiometer on Ali cloud will change, when the value of the potentiometer exceeds 500, the red light will be on, and vice versa.The following is the analog circuit diagram and circuit diagram for this case.


- 操作步骤
The Arduino code is as follows
1. 进入页面,创建一个新的产品;选择标准品类,直连设备,Wi-Fi联网方式;最后添加一个名为“ led-connect ”的设备。
Enter the page to create a new product; Select standard category, direct connected equipment and Wi Fi networking mode; Finally, add a device called "led connect".


2. 为设备新增功能:选择“在线调试”菜单,选中当前设备,点击“查看物模型”,在页面右侧选择“编辑草稿”;选择-添加标准功能-主灯开关;最后设置主灯开关的属性。
Add new functions for the equipment: select the "online debugging" menu, select the current equipment, click "view object model", and select "edit draft" on the right side of the page; Select - add standard function - main light switch; Finally, set the properties of the main light switch.


3. 新建电位器功能;概览最终功能模块。
New potentiometer function; Overview of the final functional modules.


4. 将电位器高于 500,控制灯亮的语句写在 Arduino 内
Write the statement that the potentiometer is higher than 500 and the control light is on in Arduino
5. 在阿里云平台上查看电位器和主灯的开关状态
Check the switch status of potentiometer and main light on Alibaba cloud platform.


